This blog is to help more developer to make use of Sintron Smart device and help developer's business to grow up

Thursday 19 December 2019

Sintron ST-031 Open Source Smart Controller Instruction - how to DIY your smart plug / device

this is the instruction for Sintron ST-031 Smart controller. with this instruction. you will know how to use ST-031 to remote control with your Smart Device.

requirement:

(1). ST-031 controller with a relay, of course.
(2)  you need to have some knowledge to program, using with Arduino IDE.
ps. if you don't know how to program and compile, you can skip STEP 2 and Jump to STEP 3 to upload the firmware directly.


ok, let's get started.


Step 1: APP setup


(1) Please download Blynk APP: 
Blynk Apps for iOS or Android
Drawing        Drawing
register and log in first.

(2) Create a New Project

After you’ve successfully logged into your account, start by creating a new project.

(3) Choose Your Hardware

in this case, we choose ESP8266, since ST-031 is using ESP8266 chip.


(4) Auth Token

Auth Token is a unique identifier which is needed to connect your hardware to your smartphone. Every new project you create will have its own Auth Token. You’ll get Auth Token automatically on your email after project creation. You can also copy it manually. Click on devices section and selected required device :
please find the auth token in your email, you will need to use it (Step 2) with your code later. you can also see the auth token in the project.

NOTE: Don’t share your Auth Token with anyone, unless you want someone to have access to your hardware.


(5) Add a Widget


Your project canvas is empty, let’s add a button to control our LED.

Tap anywhere on the canvas to open the widget box. All the available widgets are located here. and pick a "Button".

Widget Box


Drag-n-Drop - Tap and hold the Widget to drag it to the new position.


Widget Settings - Each Widget has it’s own settings. Tap on the widget to get to them.
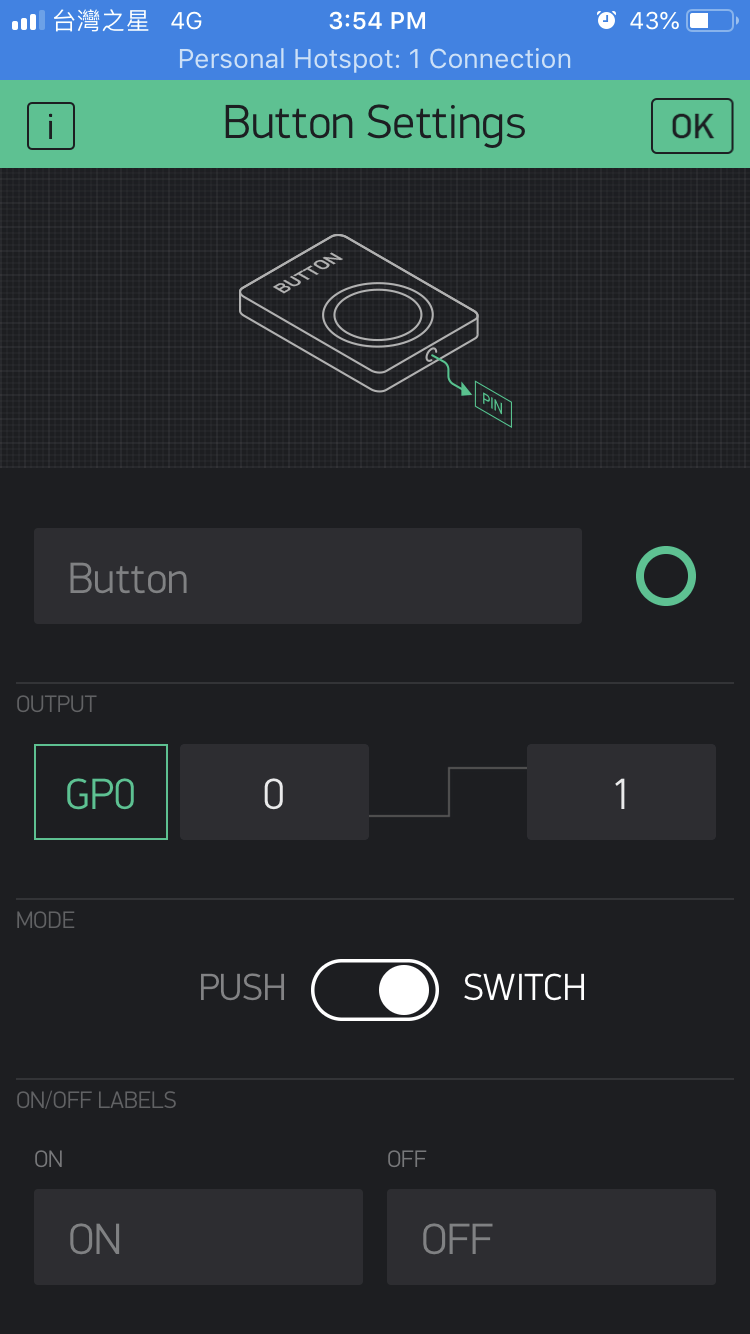
for ST-031, we are using the Digital Pin GP0. so please choose as below, you can also name the button if you would like, and then click OK:


(6) Run The Project

When you are done with the Settings - press the PLAY button. This will switch you from EDIT mode to PLAY mode where you can interact with the hardware. While in PLAY mode, you won’t be able to drag or set up new widgets, press STOP and get back to EDIT mode.
You will get a message saying “ST-031 is offline”. We’ll deal with that in the next section.


OK, good job so far. the APP setup is ok now. 


Step 2: upload firmware

before we start, you need to have:

(1) Arduino IDE installed in your computer, you can download here: we use version 1.8.5 in this case.
(2) make sure you installed the EPS8266 board installed to your Arduino IDE: we use version 2.4.1 in this case.
(3) make sure you installed the "blynk" library: we use version 0.5.4 int his case.

Download "blynk" library. and install the arduino library.


if you meet any problem and can't compile, you can use the same version as ours.


(1) Download the source code.

and open it with Arduino IDE.


(2) Revise to your own Auth Token, wifi ssid and password.

please revise these 3 lines to your own:

char auth[] = "YourAuthToken";
char ssid[] = "YourNetworkName";
char pass[] = "YourPassword";

for example, if your auto token is abc, and you router wifi ssid is def, and password is ghi

then you revise them to :

char auth[] = "abc";
char ssid[] = "def";
char pass[] = "ghi";

(3) prepare to upload ST-031:

make sure the board is ESP8266 and Flash Size is 1M(64K SPIFFS)


make sure the cable for USB programmer is connected: so it enters "flash mode".


make sure you choose the right usb port:
( for windows it would show "com port", for Mac it would show USBxxx, your port name might not be the same as mine )


(4) click upload, below is the video for this process.

video of upload

them it's completed !


now you can open your app, and try to click the button from the APP and see if it works for the relay.

FAQ:

if after the upload and can't work.
try to check below:

1. if the auth token in firmware is correct.
2. if the router wifi is 2.4G, 5G wifi can't work. ( What is 2.4G & 5G for Wifi , this is not the cell phone 5G).
3. if the ssid and password for your router is correct.


STEP 3: upload firmware by file.

PS. if you know how to do STEP 2. then it's not necessary to do STEP 3. 

step 3 is for beginner who can't compile and program the code.
we will compile the program the code specially for you. and then you just need to upload it 


(1) please prepare your "auth token" ( you got in STEP 1 ), and your router's wifi ssid and password.

(2) please send email with

title:   "st031 upload firmware by file"

content:

your "auth token" ( you got in STEP 1 ), and your router's wifi ssid and password.
( make sure these 3 info included and correct.)


to :  sales@sintron.co.uk

(3) then we will send the compiled software file back to your email. 

(4) once you receive the file, please upload it directly to ST031. below will show how:

first, use your cell phone to share wifi hotspot with this

ssid:   "sintron"                --> ps. do not include the symbol "".

and

password "12345678"     --> ps. do not include the symbol "".

by default, st031 would connect to this ssid and password after power on.

then you should be able to see ST031 connects to your wifi hotspot.


(5) use your computer to connect to your phone's wifi hotspot too. so that your computer and ST031 connects to the same wifi now.

then open browser ( Chrome or Safari etc..) and use this link:

http://st031-webupdate.local/update

then you can see the upload option.


please select and upload the file we sent to your email. and please don't power off during the update.

then it is done!


Step 4: How to control.

now you can use the APP to control it.


Share:

Tuesday 12 November 2019

is your Smart Plug / Device Safe ?

Please check this article:  Stop China's Access to Internet of Things Data

nowadays lots of people would purchase Smart Plug, so while they are not nearby they can use voice control or by mobile phone to control it.

but do you know when you are using the Smart Plug, the company who sold to you are also collecting your data. sometimes it's also personal data.

you register the app. so they know who you are, where you live. when you are at home or not according to your operation for the smart plugs.

when you use it, their server or system would just show like this:


yes, nowadays, it's big data era. so all the companies want your data. on the good side, they can know you better and know what you need, so to recommend better info / products to you. for example, Google & Amazon would do this too.

on the bad side, is it really necessary to collect date for your home behavior and reveal to other companies?


i don't think so !


furthermore, you don't know what else more data would be sent !!

and even they don't want to do some bad things to you. how can you know they don't get hacked and got stolen all the data away? this would expose you at a very dangerous situation.

if someone knows when you are going to be at home, and when you are not? do you think if this info is helpful? for instance, Thieves / Frauds etc..?


---


so that's why Sintron ST-027 / ST-029 Smart Plug / Outlet or further more Series don't use the way most of the companies would use. For Sintron Wifi Series, we don't require you to register any info and we don't even know what your API key is. because the API key would be randomly selected and sent by , for example, by Amazon warehouse (FBA) staff etc..

so by this method, it would ensure that you are still with privacy and no any personal info got revealed!
Share:

Wednesday 23 October 2019

Sintron ST-027 Smart Plug and Other Brand comparison.

this is the main comparison between Sintron ST-027 Smart plug and other Brand.


Share:

Monday 1 July 2019

Sintron Smart Plug / Outlet with OTA ( over the air )


Have you ever wanted to upload your own software to Smart plug or Wall switch etc...?  because you might have better idea for your own Smart Plug or you would like to customize your own use?

Now you do have this option !  ( purchase here)

Sintron Smart Device ( developer version) is with OTA included. ( only developer version )

so you don't have to do lots of Hacks, re-wiring, soldering etc... which is also dangerous for you since it's AC 110V ~ 220V. you just need to upload the firmware you got directly. then it's with your brain inside !

--

requirement :

1. Arduino IDE:
2. Make sure the Smart Plug / Wall switch connect to the same wifi as your computer.
3. flash size is less than half of Sintron Device memory.
(ST-027 is with 1M memory, ST-029 with 4M memory)


Step 1. connect them to the same wifi.

when you got the Sintron Smart device, you need to let it know your home/work 's wifi SSID and Password.

you can check the instruction here to set up the wifi ( only need the STEP 1 ):

http://st027.sintron.co.uk  ( for ST-027 plug series )
http://st029.sintron.co.uk  ( for ST-029 wall switch series )

so that you can make sure they connect to the same wifi.

Step 2: Open Arduino IDE and from the tool -> Port

you will be able to find it :


if you can't find it, please restart the Arduino IDE. make sure they connect to the same wifi and also check firewall settings.


Important notice before you upload:

before you upload it, we would suggest you to test your code first, for example, using nodeMCU etc... and if you plan to upload new code once again. please also include the OTA code in. otherwise you won't be able to upload the code via OTA again !

PS. if you don't include the OTA code. and later you can't upload it again. it is not within the warranty.


how to include OTA code:

1). include these library.

#include <ESP8266WiFi.h>
#include <ESP8266mDNS.h>
#include <WiFiUdp.h>
#include <ArduinoOTA.h>

2)

in void setup () :add below lines


  ArduinoOTA.onStart([]() {
   
    Serial.println("Start updating ");
  });

  ArduinoOTA.onEnd([]() {
    Serial.println("\nEnd");
  });

  ArduinoOTA.onError([](ota_error_t error) {
    Serial.printf("Error[%u]: ", error);
   
  });

  ArduinoOTA.begin();


3) in void loop () :

  ArduinoOTA.handle();


once you make sure these code are included, then you can upload OTA again.


you can purchase the Sintron Device (developer version here )


https://www.sintron.co.uk/products/sintron-st-027-smart-plug-socket-for-developer-version-1

https://www.sintron.co.uk/products/2x-sintron-st-027-us-smart-plug-socket-for-developer-version


Share:

Thursday 27 June 2019

How to use your own domain to control Sintron Smart Device ( ST-027 ST-029 etc..)


This Instruction shows how you can use your own domain to control the Sintron Smart Device.

if you are a developer or if you want to sell Smart Device to your customers. and you don't want them to find the source and real price. or you just want to make your own Smart Home products. this would be a good instruction for you.


if you only use iPhone Siri with Home Kit. you can check this blog too: How To Control Sintron Device with iPhone Home kit

ok, let's get started.

when you get the Sintron Device ST-027 / ST-029 etc... you will also get a API key ( from QR code )

also you will get the command link, for example :

https://sintron.vip/?host=google&username=sintron&auth=81aa151057ed4cd1ba76bb6d54483092&led=D2&pin=D2&action=off

( in this case, API is 81aa151057ed4cd1ba76bb6d54483092 )

and this article is going to show you how to make the link to be :

http://yourdomain.com?host=google&auth=81aa151057ed4cd1ba76bb6d54483092&led=D2&pin=D2&action=off


Method 1: Sintron already created this server for you, so just point your domain to this ip : 18.218.18.3

note: you can register a new domain for just a few bucks from godaddy.com etc..

( ps. we might change the ip once after one year, you can send us an email, and let us notify you before we change ip, the next time we change ip would be on  "1st Feb 2020" )

then you can use your own domain to control it.

you can try :

http://yourdomain.com?host=google&auth=81aa151057ed4cd1ba76bb6d54483092&led=D2&pin=D2&action=off

and see if it works:

the benefit of this method is, it's very easy for you to set up. but the downside is, you can only use "http", but can't use "https". if you would like to use https, please check method 2.


Method 2. you can also create your own server. 


Theory: we are going to run a server by node.js ( Sintron Provides the app ) in computer ( we choose linux in this example, you can also run it in windows etc..) , then point the domain to the server. then it would be ok. 


Step 1. you need to have your domain first. ( of course. ) , you can register one from Godaddy.com etc..


Step 2. you need a cloud computer with linux system ( windows is also ok, but linux is more stable), you can register it from amazon aws or google cloud platform (GCP)
aws is free for 1 year, and GCP is free for $300. or you can also use your own linux computer.

please google how to create a VM instance, ubuntu 16.04 above is recommended.


Step 3. after you have a VM instance Ubuntu 16.04 or above.

please SSH connect to your VM instance.

and install necessary tools first.


in command line:

do not copy "$", this just shows it's the command.
press y & enter if you see any questions.


$ sudo apt-get update

$ sudo apt-get upgrade

$ sudo apt-get install npm nodejs unzip nginx

these might take some minutes.


Step 4: update npm & nodejs to newer & stable version and then reboot:

$ sudo npm cache clean -f

$ sudo npm install -g n

$ sudo n stable

$ sudo npm install pm2 -g

$ sudo reboot


Step 5.

Sintron already created a node js app for you.

let's download it :

$ sudo git clone https://github.com/kingccf/Sintron-domain-transfer.git

$ cd Sintron-domain-transfer


$ sudo npm install request


Step 6. now that you already have the app, then you just need to deploy it. then it would be ok.

$ pm2 start domain_transfer.js 


ok, now the server is running ! and setup is completed !!


However, in the app, we are using port 8080 to run the server, so we need one more step. yes, we need to open port 8080 from firewall. otherwise firewall would block the connection.


Step 7. allow port 8080 from firewall.

let's use Google cloud platform as an example,

Network - VPC network - Firewall rules - create firewall rules

screenshot as below. and save it.


now it would work ! Congratulations!

you can try :

http://yourdomain.com:8080/?host=google&auth=ad022d9b3b3b4174b616f562c4f3a28b&led=D13&pin=D14&action=off

( note: only http, don't use https for now, we will need to install https certificate later, and remember to put 8080, we will also use nginx to forward the port, so later we don't need to specify 8080 too )


the next 2 steps, we are going to make them even better.


Step 8, forward http 80 port to local 8080 port.

for the webpage, we don't need to put :80 in the end, for example: http://google.com:80, because by default browser would think it's port 80.

so we would like the url to become :

http://yourdomain.com/?host=google&auth=ad022d9b3b3b4174b616f562c4f3a28b&led=D13&pin=D14&action=off


by using Nginx.

when receiving request from port 80 ( normal http request ), Nginx would bypass it to our server in 8080. this is how it works.


so we first edit the configuration file.

$ sudo nano /etc/nginx/sites-enabled/default

then put # in front of this line: index index.html index.htm index.nginx-debian.html;

#index index.html index.htm index.nginx-debian.html;


and also add this line :

proxy_pass http://localhost:8080;


then "ctrl O" to save it, "ctrl X" to leave the editor.


$ sudo fuser 80/tcp

just in case some other app might occupy port 80. we kill port 80 first.

$ sudo service nginx start

start the nginx now.

now you can see it is working with :


 sudo service nginx start
http://yourdomain.com/?host=google&auth=ad022d9b3b3b4174b616f562c4f3a28b&led=D13&pin=D14&action=off

horrey !


Final Step .

now we are just missing one part. " HTTPS" for security.

i found this artical is very helpful.

https://www.digitalocean.com/community/tutorials/how-to-secure-nginx-with-let-s-encrypt-on-ubuntu-16-04


then you will get the URL with HTTPS too now. it's all done !


if you have any questions, please feel free to post a comment below.


or if you would like to own your own server with your own ip, but still doesn't know how to create the server after this instruction. we can also help you to create it, you can contact us too.


Share:

Monday 24 June 2019

Sintron IOT - How to embed Smart Plug & Smart Device into website pages


Demo

Below is one example to show you how to embed the Sintron Smart Device to your webpage. you can click and see how it reacts. this would require you to have some basic HTML skills, and put the javascript in. the html and javascript as below:

Sintron Smart Plug / Outlet Website embeded Click the button to trigger the light from Sintron Smart Plug.


below is a video to show how it works:


Download HTML Sample


please remember to change the turn on and turn off command to be yours:

  function officelighton(){
        var url = "https://sintron.vip/?host=google&username=sintron&auth=81aa151057ed4cd1ba76bb6d54483092&led=D13&pin=D14&action=on"


and

  function officelightoff(){
        var url = "https://sintron.vip/?host=google&username=sintron&auth=81aa151057ed4cd1ba76bb6d54483092&led=D13&pin=D14&action=off"


then copy & paste the code to your website ( in between <body> of html ). then it should work.

Share:

Wednesday 5 June 2019

How to use iPhone Siri Home Kit with Sintron Device. ( ST-027 Plug & ST-029 Wall switch ) -- with raspberry Pi

difficulty level: Medium

note: Sintron Device Has the version without Logo on product itself. so it's good for developer to build and sell to customers.

video for demo here:


Most of Plugs can support Amazon Alexa and Google Home. but almost non of them still can't support iPhone Siri Home Kit yet. ( June 2019 )

Sintron Device : for example ( ST-027 Plug & ST-029 Wall switch ) do have the ability to be embedded this function for iPhone Users.

this is also a good information for you to help your customer or family to build safe Smart Home. only need to use HomeKit app built-in the iOS, and combine all things there. no need to use multiple apps.

easy and quick to control.

if needed, you can also contact us to support you and customize what you need. we hope to work with you to build your customer's smart home too.

--

Requirement:

hardware:
1. Sintron Device ( ST-027 Plug & ST-029 Wall switch Series ) of course.
2. Raspberry Pi board.

knowledge:
1. some basic linux command experience.
--


Theory before we start: Sintron Device doesn't not connect to iOS device directly, so that we need to use a hub ( raspberry pi in this case ) and help us to communicate between Sintron Device and iOS. so first we will install "homebridge" software and also plugin to raspberry pi. then also use the app Sintron provided. then they will combine together.

this article would assume you are familiar with linux/raspberry pi and command line.
if you are not familiar with this, you can also purchase SD card with pre-installed system directly. then you can skip All Steps below.

buy here.( will update the link soon )


you can also download our pre-installed system and flash it to SD card directly. then you can skip Step 1 ~ Step 5.

download system file ( will update the link soon )


and of course if you would like to do it from scratch, please check below :


Step 1: turn on the Raspberry Pi with raspbian system. you can check the installation guide from official raspberry pi


*connect the ethernet cable or get wifi connected first.
* use SSH to connect to raspberry pi, so that you can copy command & paste directly. How to SSH to server from howtogeek.com.
*log in and Open terminal  ( if you are using GUI Desktop.)
*then you will see :


Step 2. install necessary software first.

in command line:
do not copy "$", this just shows it's the command.

press y & enter if you see any questions.

$ sudo apt-get update

$ sudo apt-get upgrade

$ sudo apt-get install npm nodejs unzip


these might take some minutes.

Step 3: update npm & nodejs to newer & stable version and then reboot:

$ sudo npm cache clean -f

$ sudo npm install -g n

$ sudo n stable

$ sudo reboot


(ps. you can check "npm -v" and "node -v" to check the version of the npm and nodejs )


Step 4. Install the "Homebridge" and Plugin:

$ sudo apt-get install libavahi-compat-libdnssd-dev

$ sudo npm install -g --unsafe-perm homebridge

$ sudo npm install -g homebridge-http-switch

$ sudo npm install pm2 -g


Step 5. try to run "homebridge" for the first time


$ homebridge

you will see QR code ( don't do anything first ) :


ok, so far so good. let's terminate this app first by :       "control" + "c"


Step 4. Download Sintron nodejs app:


$ wget https://www.dropbox.com/s/dtqum7uyh1l4dl9/sintron_iPhone_SIri_homebridge_server.zip

(a little bit too long for a blog, don't miss the last letter "p" )

$ unzip sintron_iPhone_SIri_homebridge_server.zip


Step 5. All prepared !  Let's get them running !!


run sintron app:


$ pm2 start sintron_homebridge_server/sintron_homebridge_server.js

it would show:


Step 6. Prepare config.json file for homebridge.


before we run homebridge, we need to add a config.json file to system.


choose the example that suits the quantity you have. for example, if you have 2 pcs of Sintron Device, you can download the " 2 device config.json" 

then open it with  "plain text" editor.

REALLY IMPORTANT: You must use a "plain text" editor to create or modify config.json. Do NOT use apps like TextEdit on Mac or Wordpad on Windows. Apps like these will corrupt the formatting of the file in hard-to-debug ways. free Atom text editor is recommended.

--

the example you downloaded would look like this format.

---------


{
  "bridge": {
    "name": "Sintron Device",
    "username": "AE:72:E6:5D:1D:83",
    "port": 51826,
    "pin": "897-23-872"
  },

  "accessories": [
    {
      "accessory": "HTTP-SWITCH",
      "name": "fan",

      "onUrl": {
        "url": "http://localhost:4000/?host=google&username=sintron&auth=81aa151057ed4cd1ba76bb6d54483092&led=D13&pin=D14&action=on"
      },
      "offUrl": "http://localhost:4000/?host=google&username=sintron&auth=81aa151057ed4cd1ba76bb6d54483092&led=D13&pin=D14&action=off",

      "statusUrl": {
        "url": "http://localhost:3000/?host=google&username=sintron&auth=81aa151057ed4cd1ba76bb6d54483092&led=D13&pin=D14&action=off",
        "method": "GET"
      },

      "pullInterval": 50000,

      "debug": true
    }

  ]

}


----------

please replace the "onUrl" , "offUrl" and "statusUrl" for your own Sintron device.
( this is using one device as an example, for multi quantity, please change the "onUrl" , "offUrl", "statusUrl" one by one )


for example, if your Sintron Device turn on command is:

http://sintron.vip/?host=google&username=sintron&auth=81aa151057ed4cd1ba76bb6d54483092&led=D13&pin=D14&action=on

then you change it to : localhost:4000

http://localhost:4000/?host=google&username=sintron&auth=81aa151057ed4cd1ba76bb6d54483092&led=D13&pin=D14&action=on

and then put it back to "onUrl", 

the same to "offUrl"

if your Sintron device turn off command is:

http://sintron.vip/?host=google&username=sintron&auth=81aa151057ed4cd1ba76bb6d54483092&led=D13&pin=D14&action=off

-->then you change it to : localhost:4000

http://localhost:4000/?host=google&username=sintron&auth=81aa151057ed4cd1ba76bb6d54483092&led=D13&pin=D14&action=off

put it back to "offUrl" too.

and for statusUrl. you can change onUrl from : localhost:4000 to localhost:3000. 

http://localhost:4000/?host=google&username=sintron&auth=81aa151057ed4cd1ba76bb6d54483092&led=D13&pin=D14&action=on

--> change it to:

http://localhost:3000/?host=google&username=sintron&auth=81aa151057ed4cd1ba76bb6d54483092&led=D13&pin=D14&action=on

put it back to "statusUrl"


now we have the config.json customized with your Sintron device.

-

let's put it into system:


$ nano ~/.homebridge/config.json

then paste the config.json you just customized and "ctrl" + "O"  to save it.


Step 7. Get homebridge running. ( finally ! )


$ nohup homebridge >homebridge-sintron.out &

running it in background


$ cat homebridge-sintron.out

then you would see QR code again, it's running now !


1) make sure your iOS device connect to the same router as the raspberry pi.


Scan this code with your HomeKit app on your iOS device to pair with Homebridge:
Or enter this code with your HomeKit app on your iOS device to pair with Homebridge:

then you should be able to see the device show up in your HomeKit app, and you can control it now !


video for how to scan and control here:


-----

FAQ:

1) Home app shows i can't add duplicate device.
it's possible you already scanned before, so there's a record.
try to clear the record and run again:

$ sudo rm -r ~/.homebridge/persist/  


2) after some periods it doesn't work anymore.

try to restart it, and launch the apps again:

$ pm2 start sintron_homebridge_server/sintron_homebridge_server.js

$ nohup homebridge >homebridge-sintron.out &


----


for any questions, you can comment below or send email to : sales@sintron.co.uk


Share:

Sintron

Search This Blog

Powered by Blogger.

Blog Archive

Sintron ST-031 Open Source Smart Controller Instruction - how to DIY your smart plug / device

this is the instruction for Sintron ST-031 Smart controller. with this instruction. you will know how to use ST-031 to remote control with y...

Labels